理一下HDFS上传的工作原理,然后追一下源码。上传工作原理和源码刨析放下一篇总结。
本机环境:
| 操作系统 |
ubuntu 16.0.4TLS |
| hadoop版本 |
hadoop-2.7.3 |
| HA |
否(随便搭了个分布式) |
HDFS上传文件原理图
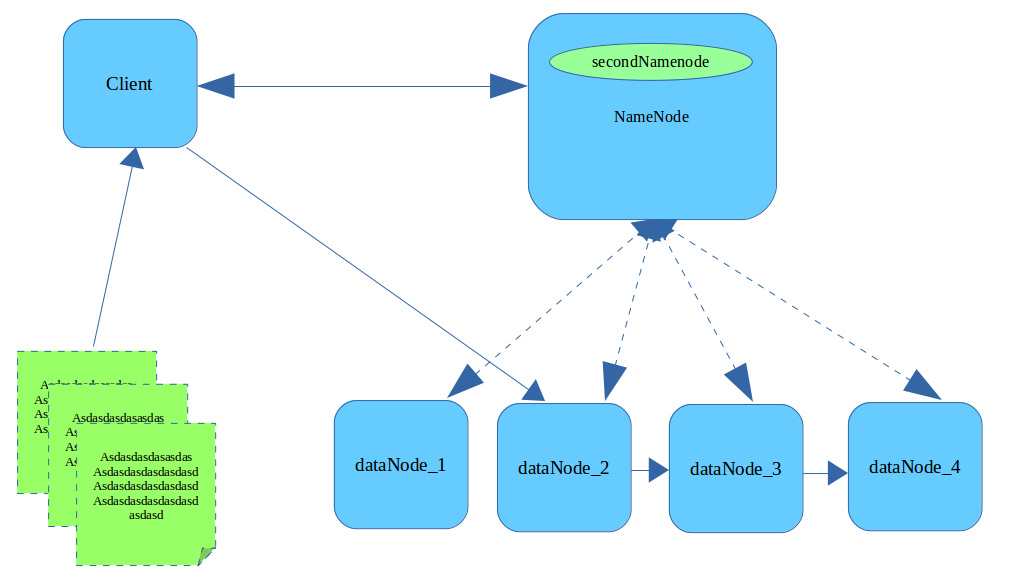
- Client会将文件切分成指定大小的块(block),块的大小默认128M
- Client会从第一个块开始,向NameNode发起上传文件请求,通过RPC与NameNode建立通讯。
- DataNode定时向NameNode汇报自己持有的数据信息(心跳机制)。NameNode收到上传文件请求选择合适的DataNode节点信息(MetaData)返回给Client。
- Client读取MetaData与DataNode2建立链接,并告诉DataNode_2,还想把这份文件传送给DataNode_3和DataNode_4,随后数据以packet数据包的形式传输,中间会经过chunk校验等。
- dataNode_2拿到数据将数据存入磁盘,与dataNode_3建立连接,传给dataNode_3,同理完成dataNode_4传输。中间只要有一个成功及判定为成功。
元数据存储
可以将元数据理解为描述数据的数据,红色部分就是元数据。
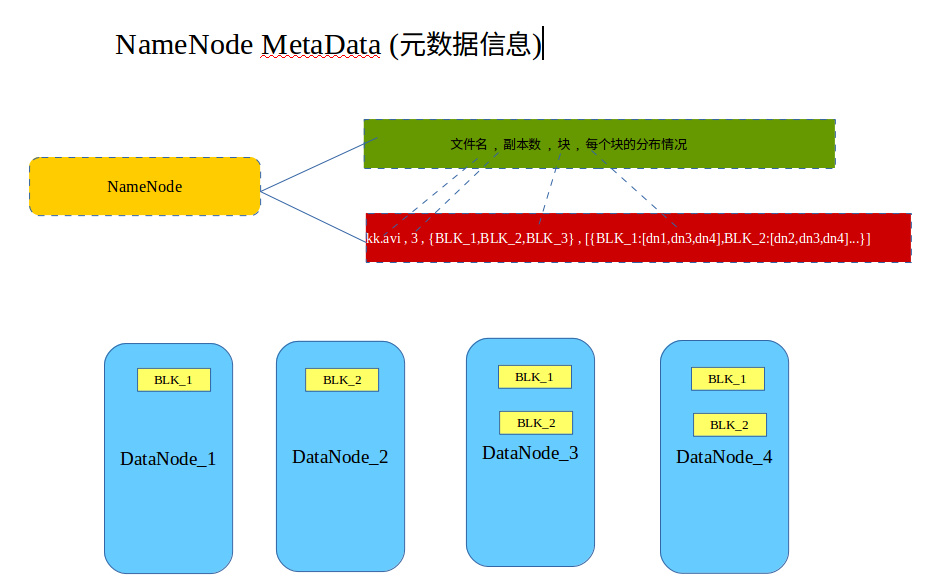
元数据是从fsimage文件中读取出来的,在我们对hdfs进行操作时,元数据都会发生改变,那么fsimage的数据是谁写进去的?SecondNameNode中用了一种机制可以帮助实现这个操作,叫checkPoint。这的水有点神,后续专门进行详述。
HDFS下载文件原理图
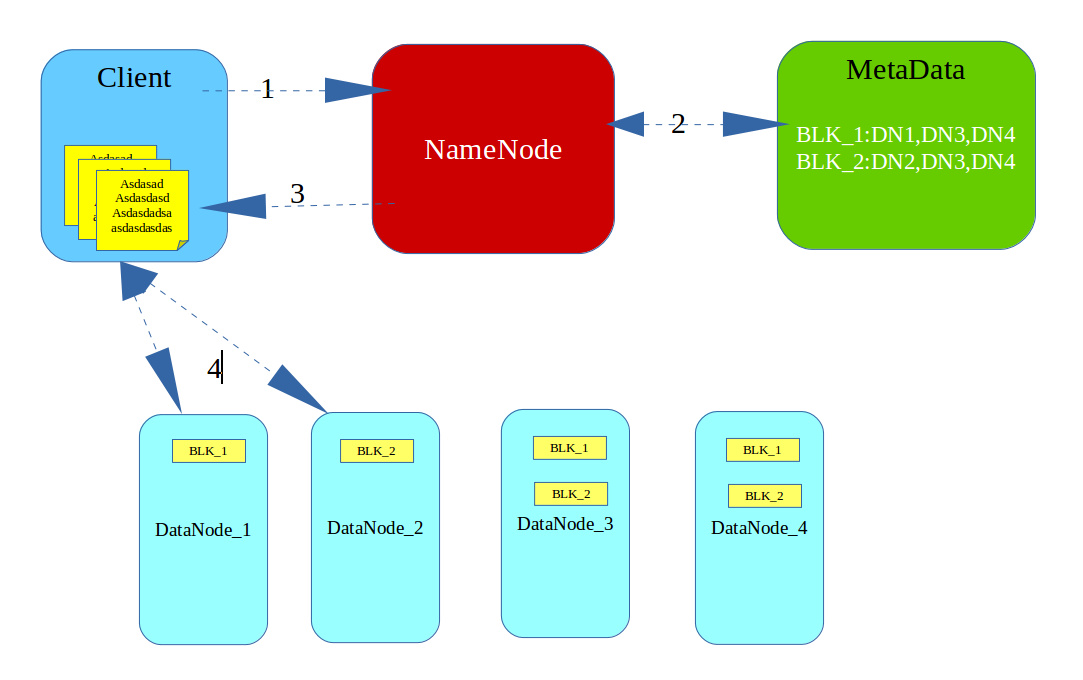
- Client请求NameNode下载BLK_1块数据,
- NameNode查找MetaData元数据
- NameNode将MetaData元数据返回给Client
- Client与元数据中任意一台机器建立链接并下载数据(重复此过程下载BLK_2)
- 在FileOutputStream中完成BLK_1块和BLK_2块的合并
FileSystem初始化源码分析
我们先简单使用hadoop提供的API来实现文件的上传下载(文件删除、改名等操作比较简单,这里不演示)。
不管我们进行什么操作,只要是对hdfs上的文件进行操作,必须对FileSystem进行初始化,我们先来分析FileSystem的初始化:
1
2
3
4
5
6
7
8
| static{
try{
fs = FileSystem.get(new URI("hdfs://cor1:9000"),configuration);
}catch (Exception e){
e.printStackTrace();
}
}
|
1
2
3
4
5
6
7
8
9
10
11
12
13
14
15
16
17
| public static FileSystem get(URI uri, Configuration conf) throws IOException {
String scheme = uri.getScheme();
String authority = uri.getAuthority();
if(scheme == null && authority == null) {
return get(conf);
} else {
if(scheme != null && authority == null) {
URI disableCacheName = getDefaultUri(conf);
if(scheme.equals(disableCacheName.getScheme()) && disableCacheName.getAuthority() != null) {
return get(disableCacheName, conf);
}
}
String disableCacheName1 = String.format("fs.%s.impl.disable.cache", new Object[]{scheme});
return conf.getBoolean(disableCacheName1, false)?createFileSystem(uri, conf):CACHE.get(uri, conf);
}
}
|
1
2
3
4
5
| FileSystem get(URI uri, Configuration conf) throws IOException {
FileSystem.Cache.Key key = new FileSystem.Cache.Key(uri, conf);
return this.getInternal(uri, conf, key);
}
|
这个方法最终返回FileSystem的子类DistributedFileSystem
1
2
3
4
5
6
7
8
9
10
11
12
13
14
15
16
17
18
19
20
21
22
23
24
25
26
27
28
29
30
31
32
33
| private FileSystem getInternal(URI uri, Configuration conf, FileSystem.Cache.Key key) throws IOException {
FileSystem fs;
synchronized(this) {
fs = (FileSystem)this.map.get(key);
}
if(fs != null) {
return fs;
} else {
fs = FileSystem.createFileSystem(uri, conf);
synchronized(this) {
FileSystem oldfs = (FileSystem)this.map.get(key);
if(oldfs != null) {
fs.close();
return oldfs;
} else {
if(this.map.isEmpty() && !ShutdownHookManager.get().isShutdownInProgress()) {
ShutdownHookManager.get().addShutdownHook(this.clientFinalizer, 10);
}
fs.key = key;
this.map.put(key, fs);
if(conf.getBoolean("fs.automatic.close", true)) {
this.toAutoClose.add(key);
}
return fs;
}
}
}
}
|
1
2
3
4
5
6
7
| private static FileSystem createFileSystem(URI uri, Configuration conf) throws IOException {
Class clazz = getFileSystemClass(uri.getScheme(), conf);
FileSystem fs = (FileSystem)ReflectionUtils.newInstance(clazz, conf);
fs.initialize(uri, conf);
return fs;
}
|
1
2
3
4
5
6
7
8
9
10
11
12
13
14
| public void initialize(URI uri, Configuration conf) throws IOException {
super.initialize(uri, conf);
this.setConf(conf);
String host = uri.getHost();
if(host == null) {
throw new IOException("Incomplete HDFS URI, no host: " + uri);
} else {
this.homeDirPrefix = conf.get("dfs.user.home.dir.prefix", "/user");
this.dfs = new DFSClient(uri, conf, this.statistics);
this.uri = URI.create(uri.getScheme() + "://" + uri.getAuthority());
this.workingDir = this.getHomeDirectory();
}
}
|
1
2
3
4
5
6
7
8
9
10
11
12
13
14
15
16
17
18
19
20
21
22
23
24
25
26
27
28
29
| @VisibleForTesting
public DFSClient(URI nameNodeUri, ClientProtocol rpcNamenode, Configuration conf, Statistics stats) throws IOException {
this.clientRunning = true;
this.r = new Random();
this.filesBeingWritten = new HashMap();
SpanReceiverHost.get(conf, "dfs.client.htrace.");
this.traceSampler = (new SamplerBuilder(TraceUtils.wrapHadoopConf("dfs.client.htrace.", conf))).build();
this.dfsClientConf = new DFSClient.Conf(conf);
if(this.dfsClientConf.useLegacyBlockReaderLocal) {
LOG.debug("Using legacy short-circuit local reads.");
}
.....
if(proxyInfo != null) {
this.dtService = proxyInfo.getDelegationTokenService();
this.namenode = (ClientProtocol)proxyInfo.getProxy();
} else if(rpcNamenode != null) {
Preconditions.checkArgument(nameNodeUri == null);
this.namenode = rpcNamenode;
this.dtService = null;
} else {
Preconditions.checkArgument(nameNodeUri != null, "null URI");
proxyInfo = NameNodeProxies.createProxy(conf, nameNodeUri, ClientProtocol.class, nnFallbackToSimpleAuth);
this.dtService = proxyInfo.getDelegationTokenService();
this.namenode = (ClientProtocol)proxyInfo.getProxy();
}
.....
}
|
到此,FileSystem的初始化就基本完成。后续分析上传、下载源码,然后理一下SecondNameNode的CheckPoint机制。
本人水平有限,不当之处希望各位高手指正。另外插入是在word中画的,看起来不精致请见谅。